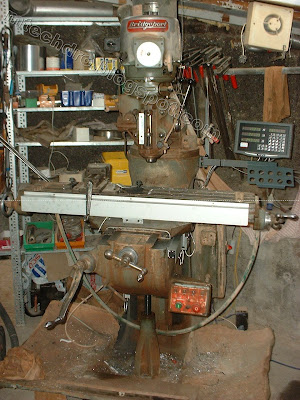
Thanks Horace for sharing with us his DRO installation on his YCM Milling machine (a bridgeport lookalike).
It is an honour to sell to a Taiwan customer, as Taiwan is well-known for their machine tools export.
mTECH DRO-2M on his YCM Milling machine (made in Taiwan)
The Y axis scale installation.
The X axsi scale installation.
Thanks Horace for sharing with us.
Monday, December 31, 2007
134- mTech DRO-2L on Birmingham lathe from John Stanke (USA)
Thanks John for sharing with us his DRO installation on Birmingham lathe.
Photo of the whole setup.
Photo from behind, wires are too long and has recommend John to tied them up together with the DRO stand.
View from below showing the Z axis scale and reader head installation.
John has chosen to install the mTECH Scale in the front for the X axis.
Here is John explanation: "My Birmingham is different than the one shown in your blog. On the tailstock side of the carriage there are some things that get in the way. The cross slide lock down screw and the the carriage lock down screw. If I installed the scale on that side I would have to remove the screws. So I tried to install to the spindle side of the carriage. "
Thanks John for sharing with us.
Labels:
mTECH,
showcase-all,
showcase-lathe
Monday, November 26, 2007
103- mTech DRO-2M on Milling Machine from Charles Weyrauch (USA)
Thanks Charles for sharing with us his Milling with mTECH DRO installation.
Charles has chosen to install the mTECH Scale in the front for the X axis.
He has also made some clear plastic sheet to prevent splashing coolant.
This is a picture of the X axis with the cover installed.
Below shows the picture of the X and Y axis scales with their covers on.
Charles says" X axis install was pretty straight forward but the Y was interesting because there was no existing surface to mount the reader head on."
Here is how he managed to install them.
See the special bracket that is made to hold the reader head. Ingenious.
Charles : "The scales arrived last Tuesday and I finished the installation yesterday. Everything worked out perfectly, thank you for a very impressive product"
Thanks again Charles for sharing with us.
Labels:
mTECH,
showcase-all,
showcase-mill
Wednesday, October 31, 2007
102- mTech DRO-3M on Bridgeport Milling Machine from David Ralston (UK)
Thanks David for sharing with us his Bridgeport Milling with mTECH DRO installation.
David has chosen to install the X axis Linear Scale on the front, he has a good reason:" The x axis is mounted on the front to save losing the 35mm on the y axis as you always need it. The locking screw on the x axis may have to be modified. Fitting to rear is much easier though"
David on his preference for a 3-axis DRO system :"The z axis is worth the extra money could be fitted neater but will do for now. may need extra guard to protect from coolant. "
Here is the photo of the Y axis. For this Y axis, most people will find it the toughest of the 3 axis.
But David thinks otherwise : " y axis straight forward. "
Installation is well done and Here he summarized his project :
"great to have it, very much needed and worth the money many thanks ."
Labels:
mTECH,
showcase-all,
showcase-mill
Thursday, October 25, 2007
96- mTech DRO-2L on Harrison L5A (1961) from Ross Crymble (UK)
Thanks Ross for the excellent photo of his Harrison L5A from 1961, which is beginning to show his age. However, with the addition of the mTECH DRO-2L, it is given a new lease of life.
Photo showing the completed machine with mTECH DRO-2L
This shows the bracket mounting details for the X axis of the lathe.
Photo showing him checking the alignment of the scale with a dial gauge.
Mounting of the X scale reader head
The Z axis scale with the reader head mounting bracket in detail.
This shows the Z axis from the top.
We strive to answer any questions within 8 hours regardless of time zone. We also have a team of experience engineers whom can answer any questions on the installation of the machine.
Here is Ross :"Hi Scott, finished fitting my DRO to my 1961 Harrison L5A.
Everything is working great and your equipment is fantastic, it has given my machine a new lease of life."
Photo showing the completed machine with mTECH DRO-2L
This shows the bracket mounting details for the X axis of the lathe.
Photo showing him checking the alignment of the scale with a dial gauge.
Mounting of the X scale reader head
The Z axis scale with the reader head mounting bracket in detail.
This shows the Z axis from the top.
We strive to answer any questions within 8 hours regardless of time zone. We also have a team of experience engineers whom can answer any questions on the installation of the machine.
At the end of the day, Ross has done a good and professional job in the installation.
Ross:“Thanks for you quick response to my other emails and advice.”
Labels:
mTECH,
showcase-all,
showcase-lathe
Friday, October 19, 2007
83- mTech DRO-2L on Birmingham model 1440 from Hamilton/ITS (USA)
The lathe is a Birmingham model 1440. 14 inch swing, 40 inch travel.
mTECH DRO offer professional features with an affordable price. Michael says "We are very pleased with the system. It is easy to use and has a lot of features."
Here shows the mTECH DRO-2L in action.
Another shot of the DRO-2L
The X axis mounting and the cable neatly clipped.
This is the professional way of doing. Excellent job !!
A direct view of the X scale installation.
The Z axis installation. I also personally like the use of the block to elevate the scale.
This will let the metal chips fell through and coolant to slip through.
Michael on why he didn't use the cover "I mounted the Z spar on the backside of the lathe and didn’t use the cover – simply as we don’t use the lathe for production work."
Conclusion is EXCELLENT JOB!!
Labels:
mTECH,
showcase-all,
showcase-lathe
Wednesday, October 17, 2007
070917- Pinacho Lathe machine (Spain) with mTECH DRO-2L
Thanks to Inaki from Spain for sharing his photo on a DRO installation on a Pinacho Lathe machine.
This shows the X axis installation, Below that is the Z axis scale
This is from the front, it shows the X axis installation.
Great Job.
This shows the X axis installation, Below that is the Z axis scale
This is from the front, it shows the X axis installation.
Great Job.
Labels:
mTECH,
showcase-all,
showcase-lathe
070827-CHEN HO milling machine with mTECH DRO-2M
Thanks to SUNNY for his photo on a DRO installation on CHEN HO Milling machine.
This shows the X axis installation, though we could not see much with the cover on.
The Y axis is done in an unconventional way, it had to be done this way due to space limitation on the Y axis.
This shows that it is possible to install a scale on any machine, your imagination is your limits.
This is another angle shot of the Y axis.
Thanks for demostrating to us your interesting way of mounting the Y axis.
Labels:
mTECH,
showcase-all,
showcase-mill
Wednesday, September 5, 2007
070831- Shizuoka VHR-A milling machine with mTECH DRO-2M
Thanks to Prakash for his photo on a DRO installation on Shizuoka VHR-A Milling machine.
This is an excellent Japanese machine and the installation had been nicely done.
Prakash has bought our mTECH DRO-2M to replace his faulty Heidenhain DRO. He had used the arm of the previous DRO.
Here shows the brand, model and serial number of the machine.
This shows the X axis installation, though we could not see much with the cover on.
He has also used back the previous cover for ease of installation.
The Y axis is done nicely, though he said "I spend the most time on the Y axis and finally figured out the correct configuration of bracket for the Y reader head. Your advice from the visual guide had been pretty useful."
Thanks once again......
Labels:
showcase-all,
showcase-mill
Saturday, August 25, 2007
070817- ST Profile Projector with mTECH DRO2M
Thanks to Thomas for his photo on a installation on ST Industries Profile Projector.
It is installed with a 0.001mm mTECH scale.
The overall view of the machine
A view of the X axis installation
A view of the Z axis installation.
Great photo and shows that mTECH DRO is capable of displaying highly accurate positioning information. It is trusted in even the most critical application. Cheers.
Labels:
showcase-all,
showcase-profile projector
Monday, August 20, 2007
Can we use 1 unit of DRO-3M and use it for both Lathe and Milling machine?
The answer is YES.
This question is asked by Jim (ebay ID : cutaway3 in New Zealand).
I find this a very interesting way to save cost, as long as you do not need both machine to work the same time.
--------------------------
Jim is asking if the "1/2" function in the mTECH DRO-3M is the same as the Rad/Dia selection?
The answer is NO.
The 1/2 and Rad/Dia selection does not work like the way you want.
The 1/2 button when pressed after selecting an axis (e.g. X), it will half the current value.
For example
X is now 100mm
After pressing the button "X" "1/2"
X will now show 50mm
For Rad/Dia selection, it will always show the axis in "Radius" mode as Radius (normal counting) or "Diameter" mode as Diameter (double the reading).
--------------
How are we going to use the TECH DRO-3M in Lathe mode especially making it count in Diameter for X axis?
The answer is setting the resolution to 0.010mm (10um).
By changing the resolution parameter in the DRO, you can use it either as a Radius counting or Diameter counting.
In normal milling mode, the resolution is 0.005mm,
when it travel 0.005mm, DRO will display 0.005mm.
when it travel 50.000mm, DRO will display 50.000mm.
In Lathe mode, you can set the X axis resolution to 0.010mm
when it travel 0.005mm, DRO will display 0.010mm.
when it travel 50.000mm, DRO will display 100.000mm.
The only catch is that you must power on/off the DRO if you want to switch between Radius or Diameter mode.
But since people will alway use the Lathe in Diameter mode, this will not be a problem.
Labels:
FAQ,
mTECH,
Technical Information
Sunday, August 19, 2007
55- mTech DRO-3M on Sieg X3 Mill - Jeffrey (UK)
Great Details went into the installation and also taking of photos which show a step-by-step guide for installation for a Sieg X3 Milling machine. Thanks to Jeffery for sharing.
DRO installed on the supplied arm with cables neatly tied up.
-----------------------
Below is the installation for Y axis.
Jeffery make some blocks to be fitted to be used as a base for the scale installation.
He also adds another base for the reader head to rest flat on.
The scale is then added on.
The cover for Y axis is then fitted on.
This is the X installation, with block at each end to elevate the scale.
Top view of the X scale.
This is after the X cover has been added.
This is the installation for the Z scale
Here shows the mounting for the reader head.
Another view showing the Z reader head mounting.
Overview of the Z axis scale.
Thanks again for the great effort to make this installation steps so clear. Cheers
Labels:
mTECH,
showcase-all,
showcase-mill
Subscribe to:
Posts (Atom)