Monday, April 14, 2008

208- mTech DRO 2L on Cadillac 14x42 Lathe -- Greg (USA)

Thanks Greg from USA (AR) for sharing with us his mTech DRO 2L on his Cadillac 14x42 Lathe
Greg:
"
Dear dro_trader,

As you might recall, i just purchased a DRO for a lathe from you.

A couple comments:
I was very pleased with the unit and the installation kit.
The variety of screws and brackets, made it very easy to install.
"

Photos from Greg:-
1) Cadillac 14x42 Lathe

2) DRO mounting
Comments from Greg
"We mounted the display on the steel truss next to the machine.
The advantage is a very solid mounting and no vibration from the machine."

3) X axis Scale installation


4) X axis Scale -close up


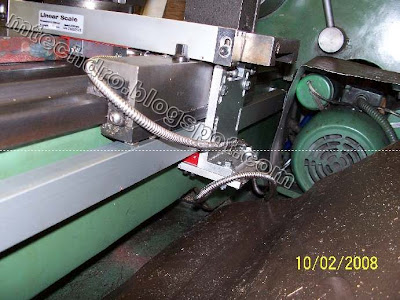
5) Z axis Scale installation


6) Z axis Scale bracket

Here is some tips from Greg:"
1. Leaving the sensor attached to the scale made it much easier to set the spacing.
2. Take your time, it took me about 15 hours to complete.
3. I had a friend hold the long scale while mounting to protect it.
4. Adjustments should be done a little at a time, moving the carriage front to back each time.
5. Have a good metric tap set"

After the installation Greg did his his job with the mTECH DRO:
"
The first project we did with the display was incredible.
What took time for us to stop an measure, the display and calculator (nearby) made the math easy,
and project was right on the first pass."


Great Job !! Thanks for sharing your photo and giving tips for installation, Cheers

187- mTech DRO 2L on Global TPG-1340 Lathe -- Rolf (New Zealand)

Thanks Rolf from New Zealand for sharing with us his mTech DRO 2L on his Global TPG-1340 Lathe (also known as Jet Lathe or CO-632A)

Rolf wrote in his Feedback :
" Excellent trader prompt shipment and good value "

Photos from Rolf:-


1) Global TPG-1340 lathe overview

2) Close up with the DRO 2L

3) X axis - top view

4) X axis - side view


5) X axis close up


6) Z axis close up


Thanks for sharing your photo , Cheers

Saturday, April 12, 2008

178- mTech DRO 2L on Grizzly G4003 Lathe -- Dick (USA)

Thanks Dick from USA (WI) for sharing with us his mTech DRO 2L on his Grizzly G4003 Lathe

Dick :
" Your product inpressed me it was more than I expected. Installtion went very well. I have a Grizzly Mill so I will be in touch with you soon.
Thanks Dick
"

Photos from Dick:-


1) Grizzly G4003 Lathe


2) X axis Scale installation


3) X axis Scale with Z axis Scale and cover


4) Z axis Scale (Front), Z axis Scale (Rear)
Dick has choose to extend the scale installation out with a L bracket.


Thanks for sharing your photo , Cheers

165- mTech DRO 2L on Ormaskiner GK185 Lathe -- Yngve (Finland)

Thanks Yngve from Finland for sharing with us his mTech DRO 2L on his Ormaskiner GK185 Lathe (http://www.lathes.co.uk/ornmaskiner/)


Yngve on his machine:
"My lathe is an Ormaskiner GK185 Lathe. It's a pretty basic model, in other words suitable for repair works and DIY projects. "

Yngve on the installation:
"As I wrote earlier the Z-axis scale was simple to install, but the x-axis was a bit more complicated, my solution is not the most ultimate because I lost about 35 mm of clearance between carrige and tailstock, but i recon I'll manage this way. The X-axis cover is a PVC-liner so far, further on I will have to make a custom cover in sheet metal."

1) Machine Overall Look

2) X axis Photo 1

3) X axis Photo 2

4) X axis Photo 3

5) X axis Photo 4

6) Z axis Photo 1


Thanks for sharing your photo from Finland (Home of Nokia)

Friday, April 11, 2008

156- mTech DRO 3M on Capstan Lathe -- Trevor (UK)

Thanks Trevor from UK for sharing with us his mTech DRO3M on his Capstan Lathe.

His Installation is unique, as he is installing 3 axis to his lathe machine. As such, he needs to use a DRO3M console to display all the 3 axis together. By adjusting the parameter setting on the X axis resolution, it is possible to make the X axis display as Radius or Diameter counting.

Email before his installation:
"Mine will be an interesting/unusual installation as I am installing the 3 axis version on a large Capstan lathe.
This probably isn't ideal as many of the milling type functions will have no purpose on the lathe,however I need the third axis for tailstock/capstan boring so the 3 axis DRO I selected is probably my best choice.

I did consider fitting a 2 axis one and using a serial switch to switch between the third and another axis but thought that might cause problems.

I believe from the manual it is possible to alter the counting resolution for the axis I will install on my cross slide in "system settings" so that it reads radius rather than diameter? If so this will be very convenient,if not It's no big problem.

regards for now will be in touch again soon.
Trevor"

Here is his photo of the whole installation process:
1 X axis during install

2 Y axis during installation


3 Z axis during install


4 overlapping x & Z covers installed


5 overlapping axis end view


6 Y axis cover installed


7 cables clipped


8 cables tidied


9 covers and cables


10 view of readout


Email after his installation:
"
As promised I am now sending you some pictures of my finished installation.Everything works fine and I am very pleased with how it all worked out.

My X and Z axis share the same measured space so I have installed one overlapping the other. It would be poor practice normally to install an axis so far away from the slide as this would introduce accurracy issues. However my machine is extremely robust and tight so in practice I have no problems on that front.

A long axis with 2 read heads would have saved the need to do the overlap if one were available.I have sheltered my X and Y axis under heavy metal sections as well as fitting the supplied covers to give them maximum physical protection in the event of a workpiece coming loose fro m the chuck or some of the larger tooling from this machine being accidentally dropped. I am very impressed with the features of the display unit.I think I have achieved an unusual and imaginative use of the 3 axis mill unit on a lathe."

For information, if you need a long scale with 2 reader head, it is available on request. But most likely, it will cost more than having 2 scales separately.

Thanks for the great photo, cheers.

154- mTech DRO on Bridgeport milling machine and Nardini Lathe -- Jim (USA)

Thanks Jim from USA (AZ) for sharing with us his mTech DRO2M and DRO2L installation on his Bridgeport milling machine and Nardini Lathe.

He has bought a DRO2M 2axis Milling DRO in November. After mTECH DRO has proven to be reliable and useful, he proceed to buy another set for his lathe in December, all within a period of 1 month.

Jim wrote :"

DRO Trader
The lathe and mill DRO were promply shipped and were a great value for the price . The attached pictures show my finished installation on a 12 " nardini and a bridgeport mill . The lathe cross slide was very difficult to fit in the limited space . There were several extra drilled and tapped holes before a final working position was found .
Thanks Jim"


Lathe
Nardini - X axis:


Lathe Nardini Z axis:


Lathe Nardini -X and Z axis:


----------------------

Bridgeport Milling : Y axis


Bridgeport Milling Overall view:


Thanks Jim again for your time and effort to take those photos.

184- mTech DRO-2L on Longem Lathe -- Pat (Canada)

Thanks Pat from Canada for sharing photos of his Longem Lathe with 12" swing and 42" bed.


"Here are the pictures of the DRO-2M
on my Longem 12 " swing 42" bed lathe. I
haven`t done the final cable routing, this was
just done for inital testing which went perfect.
thanks for everything Pat"


X axis installation


Z axis installation


Thanks once again.