Monday, March 25, 2013

BLOG - mTECH-3i on Cougar Milling Machine -- Peter Browne (Australia)


Thanks Peter from Australia for sharing with his mTech 3i on his Cougar Mill/Drill
He is using scale travel "220mm, 370mm and 420mm)
Below is the complete write-up by Peter:
INSTALLATION OF THE TECH-3i DRO ON MY COUGAR MILL/DRILL
This Chinese machine is is built to the popular ZX7550C pattern. It was built in around 2003.
I obtained it several years ago, from a manufacturer in Sydney who never used it, before winding up the business. 
My first task was to bring the machine into the workshop from it's storage in the garage.


The X-axis position provided good machined surfaces and access.
The placement of the scale and it's cover restricts Y-axis travel by about 60mm,
so that a new stop was later fitted. All that was required to get final alignment was a shim behind the reader.


The Y-axis field left something to be desired. (See below.) 
Firstly, the surfaces are painted with thick, uneven enamel.

Secondly, the area is barely wide enough to accommodate the scale, so the cover cannot be used.

For the scale I scraped all the paint off the surface, and mounted the scale as low as possible to
give me a narrow lip above for some protection to be devised in the future. 
After some shims to correct alignment the the scale sits very nicely.


The reader was mounted using some of the machined aluminium plates provided in the excellent kit from TheDroStore.com.
To the right of the scale you may be able to see a tapped hole on the mill. I decided to use a piece of aluminium channel  as a shield.

I am machining part of one side out of the channel to accommodate the scale body
and will attach the remaining complete channel side, using the tapped hole indicated.
A similar hole will be drilled to the left of the scale after preliminary fitting.

Throughout the install, there were lubrication ports to be preserved.
I was surprised this did not cause any problems. 
Also I managed to dodge the slide locks on opposite faces of the machine.


Fitting the Z-axis presented the paint problem once again. This time, however, I used a slightly different approach.
By scraping the paint carefully, I managed to obtain a usable surface, and with the help of suitable shims,
the test indicator (seen above) proved that scale alignment was satisfactory.

Once again the aluminium mounting hardware provided proved excellent to carry the Z-axis reader.
A piece of angle, trimmed down, a bit more paint scraping and a shim mounted on the knee and the job is nearing completion.

Covers were fitted to the X and Z-axis scales, with a small plate glued to the top of the Z-axis cover to help
protect it from falling coolant and swarf. (See below.)


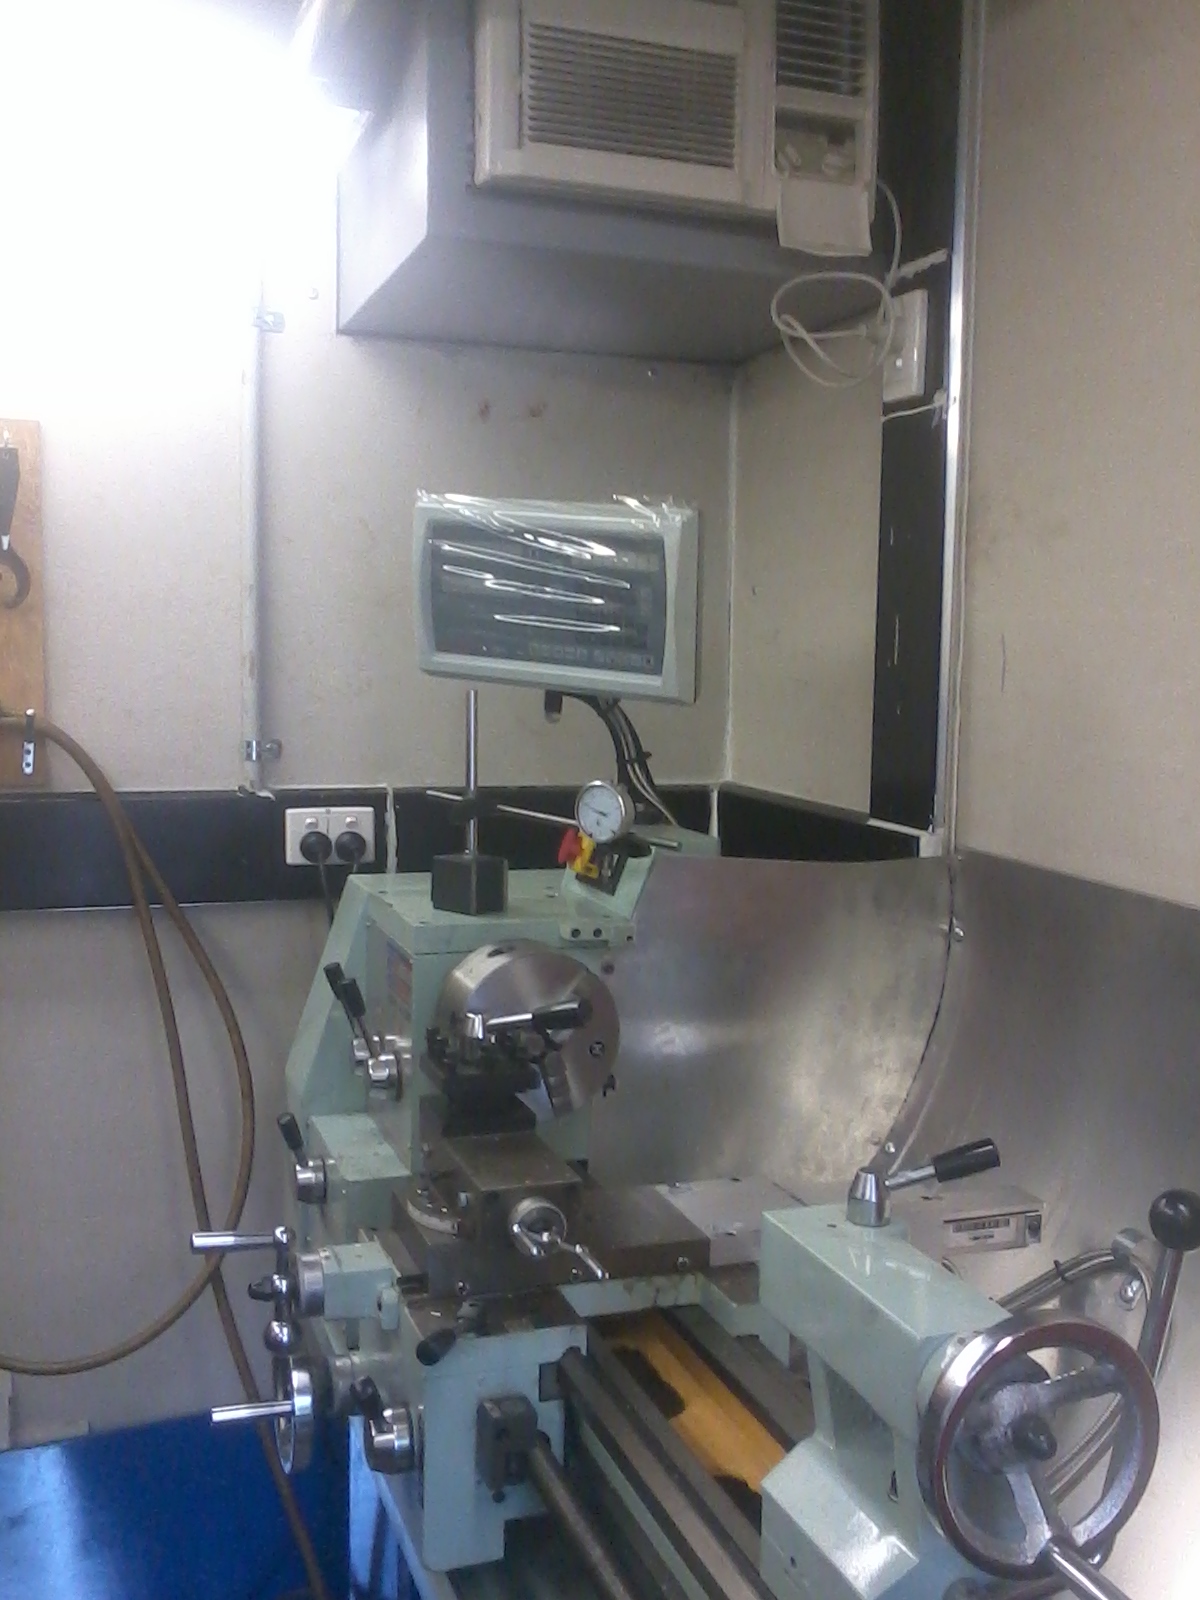
Installing the readout went smoothly.  Suitable positions were available and a transformer in the pedestal
provides 240v to power the display. The last photo shows the display in use and on the table the
shield for the Y-axis scale partly machined.

This is my very first milling operation. So far so good. No broken cutters, etc.


Considering that I have never attempted anything like this exercise before I am very pleased with the result.
I must say the kit provided, Scott's manuals and his other help have been confidence building and a big part
of completing the task at hand. As many others have commented, there was a surplus of  materials and a choice of  install methods.

Many thanks,

Peter Browne
Australia

Tuesday, January 29, 2013

mTech DRO 3M on Hafco Metal Master AL250G and HM 46 Mill drill -- Andy (Australia - brisbane)


Thanks Andyfrom Australia (brisbane) for sharing with us his mTech DRO 3M on his Mill, HAFCO METAL-MASTER  AL 250G lathe  HM 46 mill drill
The scales used in his Hafco HM 46 Mill Drill are : JCXE5-520 , 520 and 220


Photos from Andy:-


1) 
X axis Scale installation

2Y axis Scale installation


3) Z axis Scale Installation


---------------

Cross slide slide installation on the Hafco Metal-Master AL 250G.


Thanks for sharing your photo , Cheers

Monday, October 29, 2012

3 axis mTECH DRO 3M on Hardinge Lathe from Nathan - Israel

 Thanks for the photos and the detail information on the installation on his lathe with 3 axis.
Below is his story:
==================
 We have lately purchased two 3M systems from you.
One was installed on a lathe (with the 3rd axis on the tailstock!) and is working very well. It took few days of custom machining because of the machine structure.

Picture SANY1371 shows the installation on Z1 axis (we used X). The machine had a T slot in the back, so mounting the slide was easy, but for the sensor we used a combination of the parts you provided.

Picture SANY1373 shows the slide on Y. We had to construct a healthy beam to hold the slide as far as possible to the right and back, away from the turning area, to minimize spray and chips.  

Picture SANY1375 shows the installation from the back side, with the parts made to move the sensor. The parts are held the cross slide extension (it had copy attachment once). Lots of milling, drilling and threading, but it ends up very stable.

Adding the scale to the TAILSTOCK was completely another story. The tailstock body casting has no straight faces anywhere. We added an aluminum block using 2 M8 bolts + 6 mm dowel pins, curving the piece back to follow the casting shape. Then we machined the piece have a vertical face and horizontal face to attach the slide to, see picture SANY1380.
For the sensor we milled a part to attach to the quill as seen in picture SANY1383. 3 parts were involved in getting the quill motion to the sensor.

This job involved not only taking the tailstock apart, but also making the internal screw LONGER so it will extract the conical parts inserted into the quill when it is brought all the way back. We had to do it since the part we added on the quill prevented it from being pulled back enough to extract the cone.

The DRO was mounted above the lathe control panel as seen in picture SANY1376. It is convenient since the left hand is often on the panel and on/off switch anyway.

All in all the work took 5 days, one man and a milling machine.
We were very impressed with the overall attention to details you put into the kit. Everything was there, brackets, screws and washers of all kinds, cable ties, shims, and most impressive is the clear plastic cover on the DRO to keep the unit clean.
We looked at your blog, saw many examples from other users, and that gave us confidence to order and install the system.


So far this is the story of the first unit.

For the second system ,is installed on an old CMM machine with its original electronic / optics dead. We use true 3 axes here, as the CMM bridge is moved by hand and the location is visible.


Many thanks.

Nathan
Company Website: 
www.compucraftltd.com
RobotWorks website: www.robotworks-eu.com

Saturday, August 25, 2012

1762 -Myford Super 7 lathe - from Ed Dee- UK- TDS-2i - F5- 170mm, E5- 470m


Thanks to Ed for his photos of his installation of the TDS-2i DRO system on hi Myford Super 7 Lathe.
Below is his email on the installation
"Hi,
Thank you for the speedy despatch of my order (1762) - which arrived last week and has successfully been fitted to my Myford Super 7 lathe.
As you do not seem to have many pictures of a myford installation I enclose some of my setup - mainly for the cross slide - which is the interesting one (the saddle scale is just bolted on to the taper turning mount - which on my lathe isn't used).  Please feel free to pass them on should anyone else be interested.
I mounted the cross slide scale behind the saddle  as there were disadvantages is mounting it in front or behind of the cross slide (vulnerability to chuck damage + loss of use of travelling steady if mounted in front; interfering with gib-strip adjustment and saddle lock and restricting tail stock if mounted behind).  The only fittings used other than those supplied was a fabricated hanger for the cross slide reader and a section of a scale cover left over from the installation on my mill.  The smaller JCXF5 scale and cover were ideal for this application.
Regards
Ed Dee"


Wednesday, February 8, 2012

1557-Milling / Drill machine Excel tools, model PDM-30, Andy, UK. TDS-3i, 170mm-220mm-520mm

Thanks to Andy from UK for the generous photos.


This is a  Drill/MillExcel tools, model PDM-30. This is very similar to machines from Chester tools, Warco, King Canada.


It is using :

TDS-3i DRO with scales travel - 170mm, 220mm, 520mm

 
Below is an unedited email from Andy:


Hi Scott,


Used the DRO today and it has revolutionised my milling machine, so easy to be accurate now!


As promised some details of how I fitted the scales:


Cheers


Andy


My milling machine is a medium size mill/drill from Excel tools, model PDM-30. This is very similar to machines from Chester tools, Warco, King Canada, etc..


Fitting the X scale was easy, and only needed a couple of 5mm spaces to bring the scale in-line with the reader head.


The Y axis was a bit more involved and required a 4mm back plate to attach the scale to the saddle.  Also the side of the bed is angled so I had to mill the end of one of the supplied brackets to get the reader head to mount square.


The Z scale was also mounted on a 4mm back plate, spaced 30mm off the quill casting,


and the reader head was mounted to another modified bracket screwed to the turret.


Celebrating the finished job with a cuppa!