Showing posts with label showcase-lathe. Show all posts

Monday, July 20, 2015

3079- Hare & Forbes HAFCO Metal Master AL-320 lathe, DRO installation - from John - Australia - DRO-2L - F5-170 - E5-520


Thanks to John Simister from Australia for the generous photos.

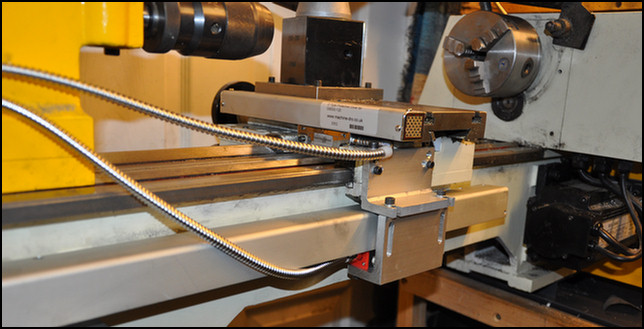
This is a AL-320 lathe Lathe.


It is using :
DRO-2L with scales travel - 170mm and 520mm

From John: 
" The installation is complete and went very smoothly. I am very happy with the finished job, however, I would be pleased to hear your comments after you have seen the photos. Any advice or criticism would be appreciated and helpful. I have taken the photos showing each stage. I wired the DRO into the lathe electrical box. The lathe is a AL-320. Also, I am happy to pass on any tips on the installation to prospective customers who are fitting the DRO to the same lathe.  Regards John”

3025- Microcut Lathe - from Steve - Australia - DRO-2L - F5-170 - E5-920


Thanks to Steve Newing from Australia for the generous photos.

This is a Microcut Lathe.

It is using :
DRO-2L with scales travel - 170mm and 920mm
"Very happy with the end result.
Ended up not using the linear scale brackets provided on this installation - we made our own.

Thanks for a great product with comprehensive installation kit and your service.

Kind regards

Steve”


Friday, February 7, 2014

2550-Lathe machine DRO 2L, F5-170 and E5-620 - from Hans-Peter - Switzerland

Thanks to Hans-Peter from Switzerland for the generous photos.

This is a  Lathe Machine.

It is using :
mTech DRO 2L with scales travel – 170mm and 620mm
 From Hans-Peter: 

I received the rulers on Friday, this gave me time for installation and adjustment.
Today, I received the display-unit.
Installed and working perfect.

Remark:
It is very good, that you inform on exact dimensions in e-bay. Due to this, I felt very confident to place a purchase order with you. Especially on the X-Axis, I only had 2mm on top and 2mm on bottom clearance. Also the combination and selection possibility of ruler-lengths and display units is just great. A very good homepage-setup you have.

The aluminium brackets were too large in hole distances (maybe for a bigger size ruler, the shims as well). No problem because I had to make special brackets anyway and I’m well equipped to do so (machines and material).

I’m very pleased with your service and communication. The instructions are well done.

Thanks and I wish you great success in doing further business.

Best regards

Hans-Peter

Saturday, August 25, 2012

1762 -Myford Super 7 lathe - from Ed Dee- UK- TDS-2i - F5- 170mm, E5- 470m


Thanks to Ed for his photos of his installation of the TDS-2i DRO system on hi Myford Super 7 Lathe.
Below is his email on the installation
"Hi,
Thank you for the speedy despatch of my order (1762) - which arrived last week and has successfully been fitted to my Myford Super 7 lathe.
As you do not seem to have many pictures of a myford installation I enclose some of my setup - mainly for the cross slide - which is the interesting one (the saddle scale is just bolted on to the taper turning mount - which on my lathe isn't used).  Please feel free to pass them on should anyone else be interested.
I mounted the cross slide scale behind the saddle  as there were disadvantages is mounting it in front or behind of the cross slide (vulnerability to chuck damage + loss of use of travelling steady if mounted in front; interfering with gib-strip adjustment and saddle lock and restricting tail stock if mounted behind).  The only fittings used other than those supplied was a fabricated hanger for the cross slide reader and a section of a scale cover left over from the installation on my mill.  The smaller JCXF5 scale and cover were ideal for this application.
Regards
Ed Dee"


Sunday, July 17, 2011

1023 - Mario from Italy with DRO on Norwik C6236 Lathe

Thanks Mario (Italy) for the photos on mTECH DRO-2L on his Norwik C6236
Lathe.

He is replacing the DRO with the DRO-2L, using back the existing scales:


Message from Mario:
====================
The DRO is in my workshop and it works great, I make model steam
loco 5 gauge, this is my hobby.

Mario

978- Dwight- Canada - CZ300/1 Lathe - TDS-2i DRO

Thanks Dwight for the nice photos:
 
The equipments are :
TDS-2i DRO
Scales 170mm and 920mm
  
 
Message from Dwight:
========== 
 
 Here is some photos after my install I mounted the cross slide scale on the front of the carriage because the cross slide and carriage locks but added a extra splash guard.


918- Vic from UK - C4 Lathe

Thanks Vic from United Kingdom for the photos on his C4 Lathe.
 
He is using a TDS-2 DRO and a F5-370mm scale.
He is using back the short scale from a previous setup.


Thursday, June 9, 2011

DRO installation on Real Bull Mini-Lathe from Henry Thomas

An excellent installation on a mini lathe.

The challenge in mini lathe is the space constraint.

Thanks for the photo, Henry, it will be a great help for our budding installer.

Here is an unedited email from Henry :

========================================


Just thought I would send some pics of my successful installation of your DRO on my Real Bull bench top mini-lathe. While it may seem overkill to mount a DRO on such a small hobby lathe, properly set up with lapped beds and ways, this is a very accurate and capable lathe, which I use for a lot of R&D work. So I wanted to add a DRO to improve my productivity. I had considered using calliper type scales, but didn't think they would be robust enough. In the end your package turned out to be only marginally more expensive. The biggest challenge was figuring how to get it all to fit, so I am really happy with how well it actually turned out.


My goal with this installation was to make minimal changes to the original appearance and operation of my mini-lathe. It has a pretty compact work space, so I didn't want the scales interfering with any of the slide movements. Below you can see how installing both the X and Z scales under the carriage has achieved this.


For the cross slide I milled out a 20 x 20 mm bar.


This is attached to the cross slide in the channel where the feed screw is located. It connects to the 120 mm X-scale under the carriage.


The X-scale is mounted under the carriage to a bracket that backs onto the same bracket that connects the carriage to the Z-scale. The other end is bolted to the under side of the apron. I had to mill a notch out of the X-scale bracket to clear the half-nuts, which protrude slightly below the apron.


Even though space was tight, I was still able to mount covers over both scales.


The Z-scale bracket spacer required a slot to be milled out to make room for the cross slide bracket.


Here you can see the Z-scale mounted to the bed and the bracket attached to the milled spacer (from above) which is attached to the back of the carriage.


I had to mill all the parts from scratch, which took a bit of time, but nothing was particularly difficult. The carriage travel is limited by the lead screw covers, but I added a stop to prevent the cross slide over-running the X-scale.


Kind regards,


-h